
Entries are the core of TrackEntry, used to log feedback, assign tasks, and track issues. This guide covers the full lifecycle of an entry.
How to Create a New Entry #
From the main TrackEntry dashboard #
1. You can access the TrackEntry dashboard in 3 different ways – from the Home page, from each Project Dashboard or when previewing a survey in the Survey creator menu – open a new entry by clicking the  button in the top-left corner.
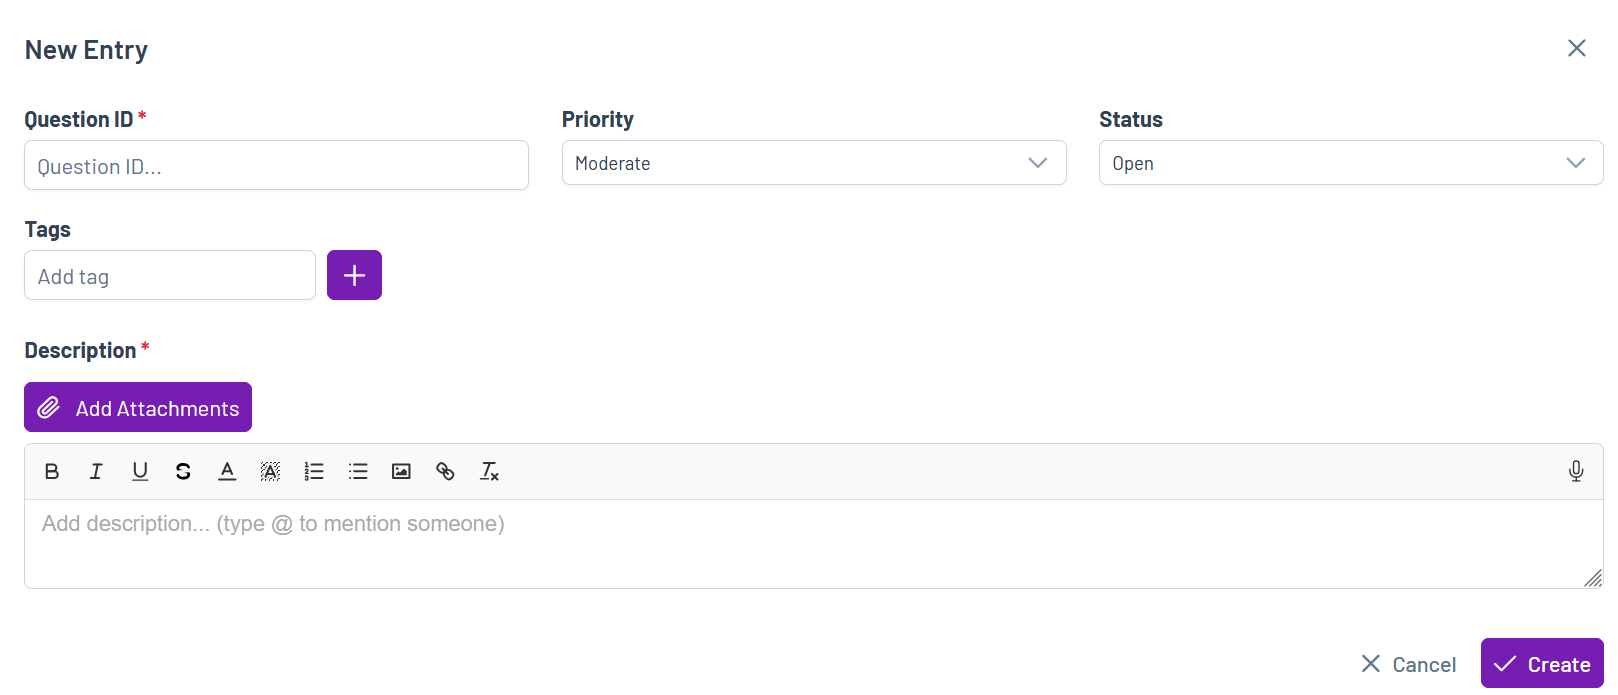
2. A “New entry” pop-up window will appear.
3. Fill in the following details:
-
- Question ID (Required): Enter the specific question number or identifier this entry relates to. Use “General” for project-level feedback.
- Priority: Select a priority level from the dropdown (e.g., Minor, Moderate, Critical).
- Status: Select the current status of the entry (e.g., Open, Pending, Implemented, Closed) to indicate its progress.
- Tags: Add one or more tags to help organize and filter entries.
- Attachments: Click the Add Attachments button to attach relevant files, such as documents.
- Screenshots: Click the screenshot icon
 to capture what is currently displayed on your screen for better understanding of the task.
 - Description (Required): Provide a clear and detailed description of the task, issue, or feedback. Use the rich text editor to format your content as needed. Speech-to-text functionality is also available. To notify a specific project member, use an @mention within the description field.
4. Once you have added the entry details, click the Create button.
From the Email Summarizer icon in the Track Entry menu #
1. When you open the TrackEntry Dashboard, choose the Email Summarizer icon available on the top left corner
2. Paste an email and press Summarize – the tool will divide the email content into separate entries.
3. Select the ones you’d like to add as track entries, add Tags and edit Priority if needed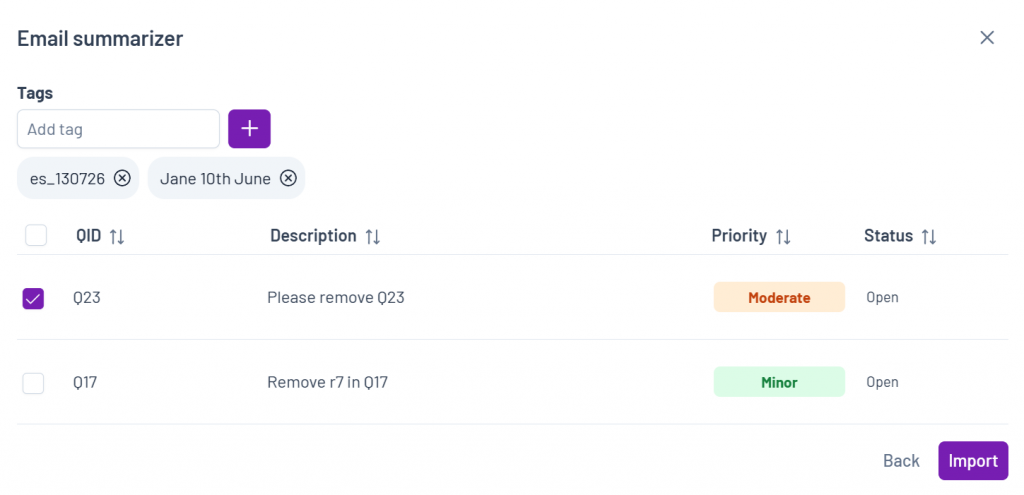
4. Press Import and the email is now summarized into relevant work entries
From the ResearchReady Analysis report #
1. After a report is run with the ResearchReady tool, you have the option to export selected findings and to directly convert these key findings into Track Entry work items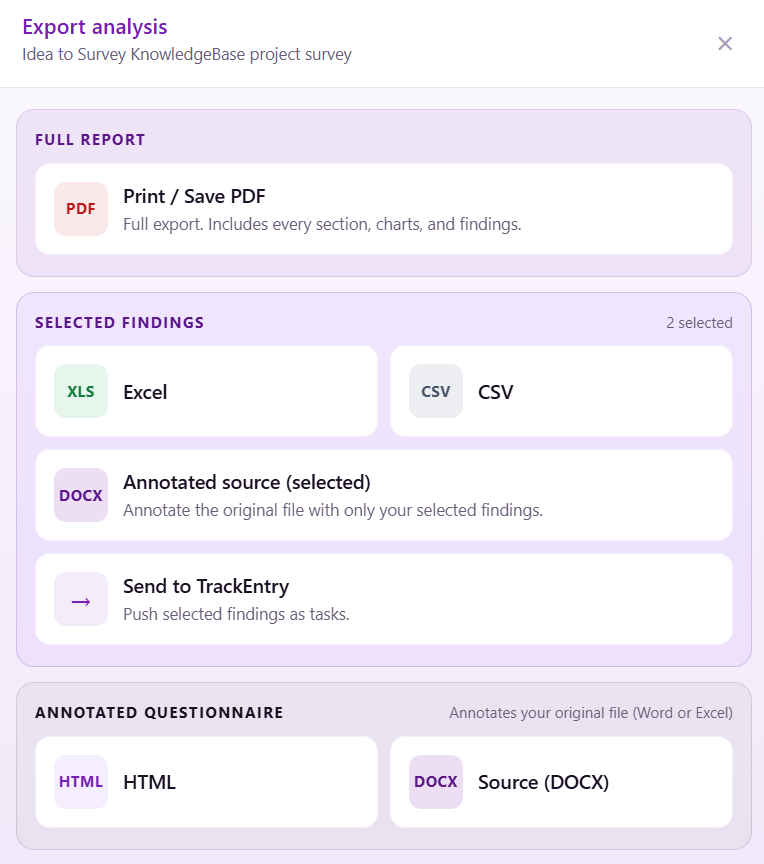
2. When you opt for sending your selected finding to Track entry, a popup window appears. Here you can choose which exact selected findings to hand off to track entry, to edit the QID if necessary and to also adjust the TrackEntry Priority
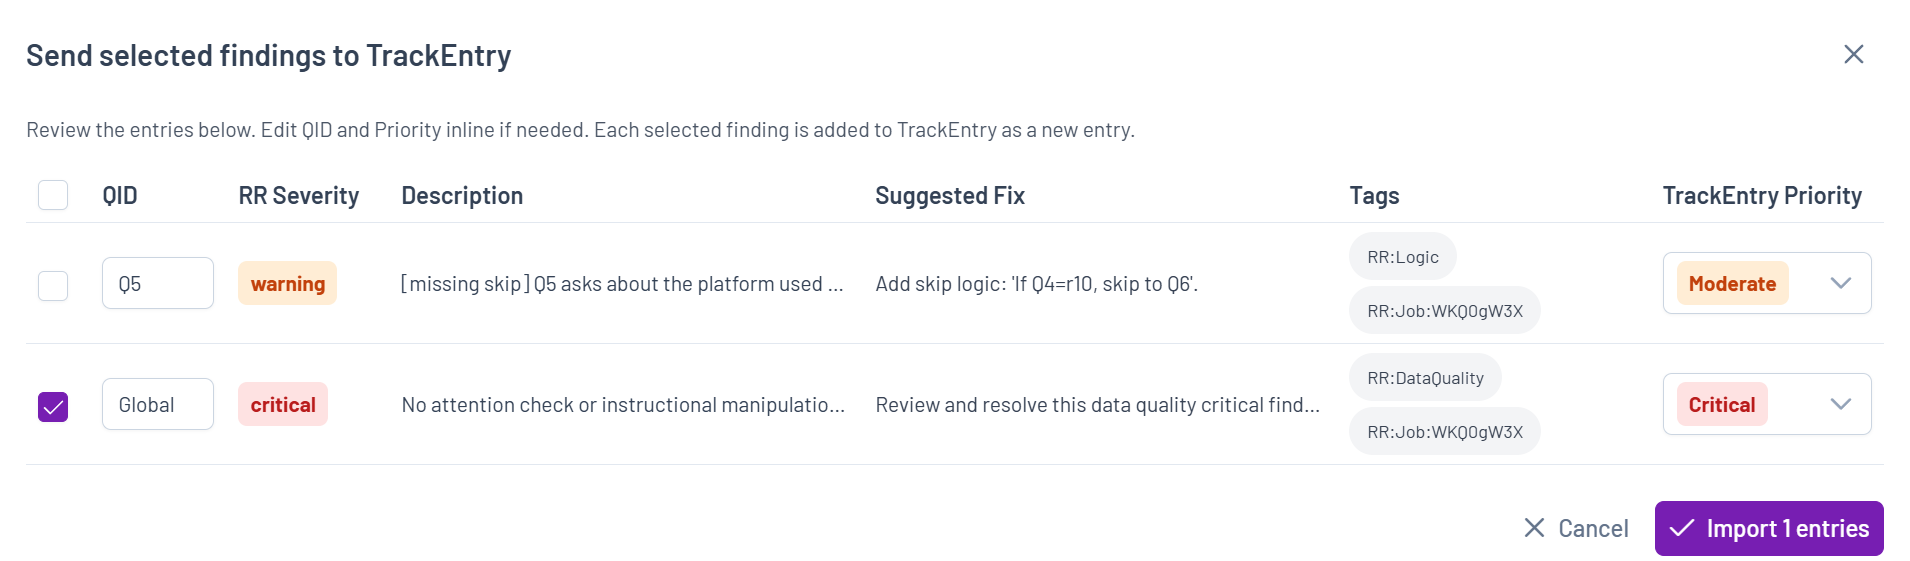
3. All settings are done, please press Import and the ResearchReady findings will turn into Track entries
4. ResearchReady findings which are added to the track entry keep their finding selection after the handoff and this way the same set can be selected for further export or review.
Once entries are created, they can be used as a source of structured feedback for survey updates.
You can use the AI Assistant to automatically apply changes based on open TrackEntry entries, helping you to resolve feedback more efficiently. See the AI Assistant section for more details.
From the QAReady check report #
1. After a check is run with the QAReady tool, you have the option to export selected findings and/or to directly convert these key findings into Track Entry work items
2. When you opt for sending your selected finding to TrackEntry, a popup window appears. Here you can choose which exact findings to hand off to TrackEntry, to edit the QID if necessary and to also adjust the TrackEntry Priority
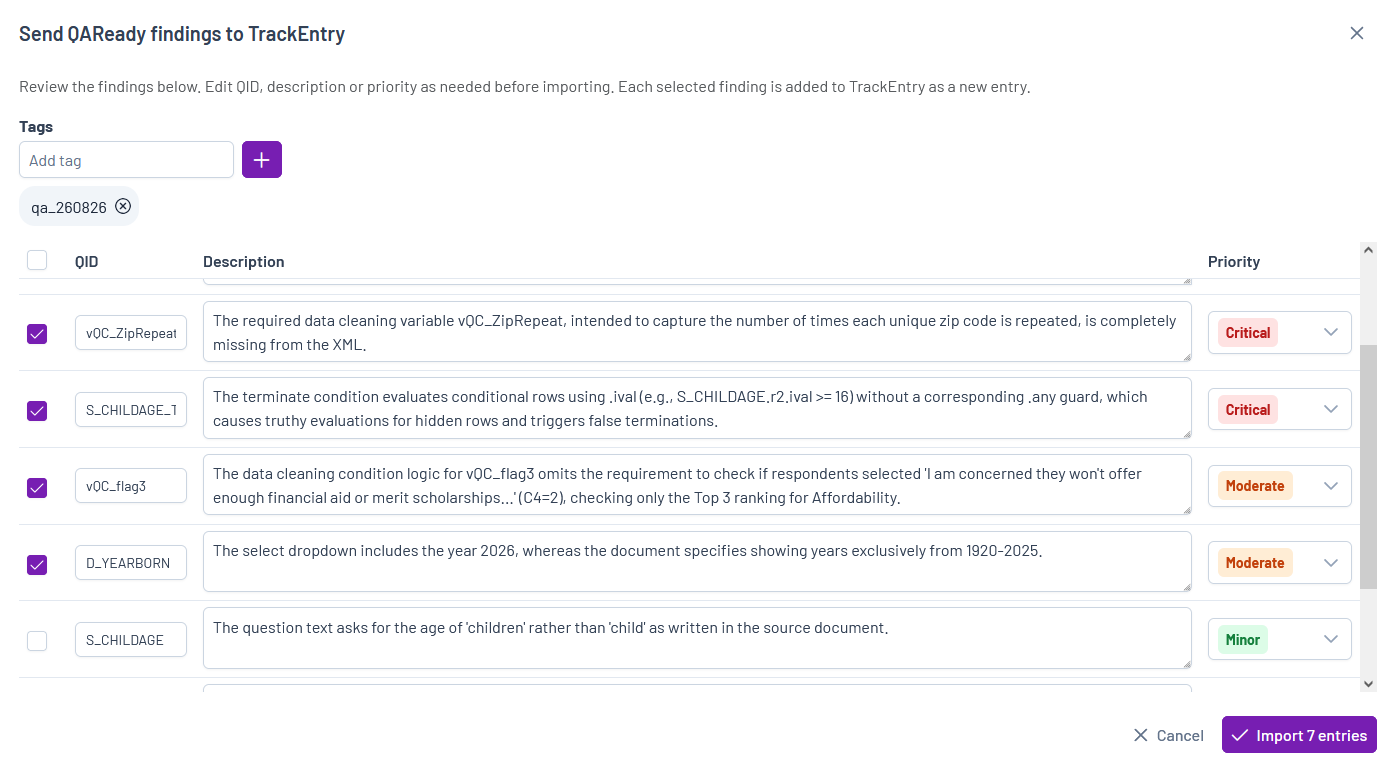
3. When ready, please press Import and the QAready findings will turn into TrackEntry entries
Once entries are created, they can be used as a source of structured feedback for survey updates. You can use the AI Assistant to automatically apply changes based on open TrackEntry entries, helping you to resolve feedback more efficiently. See the AI Assistant section for more details.
How to View and Edit an Existing Entry #
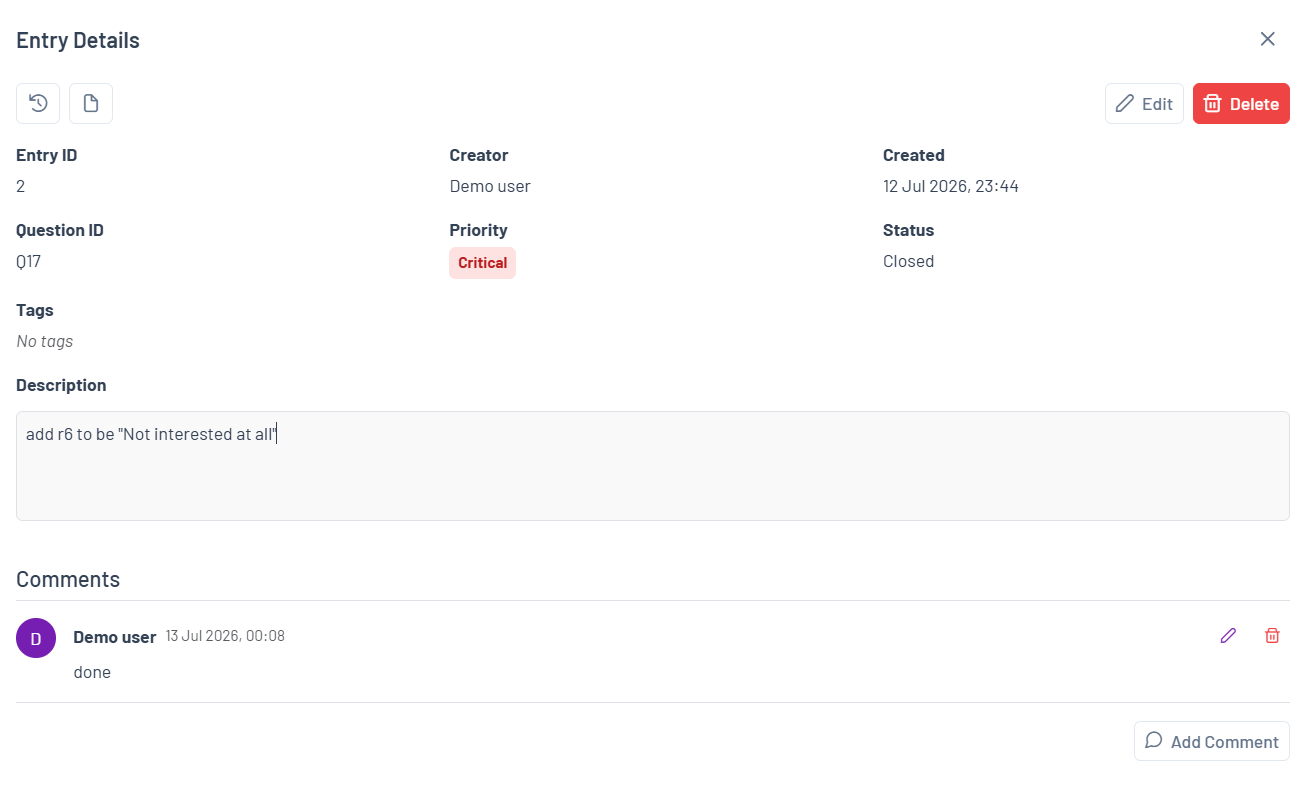
To view the details of an entry, open the Overview window.
- Table view: Click the entry description or use the icon on the far right side of the row
 .
. - Compact view: Click the icon at the top of the entry card
From this window, you can:
- View All Details: See a complete summary of the entry, including its creator, status, priority, and description.
- Edit an Entry: Click the Edit button in the top right corner to modify any of the entry’s details.
- Delete an Entry: Click the Delete button to remove the entry. This is only possible if the entry has an “Open” status.
- View and Add Comments: The lower section of this window displays all comments related to the entry. Use the Add Comment button to add a new comment and continue the discussion.
- History: Click the History icon
 in the top left corner to view the entry’s change history. This allows you to see when updates were made and what changes were applied.
 - Attachments: Click the Attachments icon
 to view all files uploaded to the entry, including attachments added in the description and comments. From this panel, you can review the files and download the ones you need.